Light-as-Air Lemon Cookies

It is so important to invest our time and energy in the things that make us happy. In today’s world of electronics and gadgets and never-ending deadlines… we can easily be swept up in the day to day necessities, unintentionally allowing the little things that bring us joy to fall by the wayside.

Life is happy, wonderful, adventurous and amazing… but it can also be stressful. Children who used to be outside playing kick the can or comparing Skip-It records are now taking lessons in exotic instruments and learning multiple foreign languages in an effort to get into a good college. And before we even have a chance to worry about college, we’re struggling to pull every string to get our 3 month old into a decent preschool.

So yes, we live in a stressful world. Which is why it’s more important than ever to counterbalance this everyday stresses with activities, environments and people that bring us joy. Life is too short to not appreciate the little things (that, as a friendly reminder, are really the big things). The key is to proactively and consciously put this time aside.

Many have mastered the art of justifying why we don’t work out, eat well, take time off of work and get enough sleep. The truth is that in having the best of intentions and taking care of others, we often forget to take care of ourselves. And I know I don’t need explain the madness in this logic, because we all know that we can’t successfully take care of anyone else until we take care of ourselves.

This week, I encourage you to make a list of 5 simple things that you love, and to set aside an hour or two to just indulge in something that brings you effortless joy. Whether it’s running, painting, playing chess, golfing, reading, surfing, needlepointing or napping… take time this week to make it a priority. For me, it’s cooking (no surprise here).

And spending time with my amazing friends and their adorable dog, Reagan.

Happy Thankful Thursday :)
Light-as-Air Lemon Cookies
Ingredients:
2 cups flour
1 tbsp. baking powder
1 tsp sea salt (preferably Maldon)
1/4 cup butter, softened
1 cup granulated sugar
1 large egg
2 tbsp. sour cream
2 tbsp. full-fat milk or half and half
2 tbsp. freshly squeezed lemon juice
1 tbsp. vanilla extract
Instructions:
Preheat oven to 350 degrees
In a small bowl, mix the flour, baking powder and salt
In a stand mixer using a paddle attachment (as opposed to the whisk), combine the butter, 1/2 cup of the sugar, egg, sour cream, milk, lemon juice and vanilla and mix thoroughly. (Hint: be sure not to melt the butter, but just to soften. Melted butter will result in sticky dough that cannot be formed into balls)
Once the ingredients are thoroughly combined and while the mixer is running on low to medium speed, slowly add the flour mixture until combined
Using your hands, form the dough into small balls approximately 1 to 1 1/2 inches in diameter. Roll in remaining 1/2 cup of sugar, and place on a greased cookie sheet. If consistency of dough is sticky and too difficult to roll into a ball, freeze the dough for 5-10 minutes
Bake for 10-12 minutes max, being careful not to allow them to cook any longer. They will quickly dry out and burn along the bottom if left for a longer period of time
While allowing for the cookies to cool, grate lemon peel over the top and then serve
Store in an air-tight container for up to a week
*Adapted from Yes to Yum
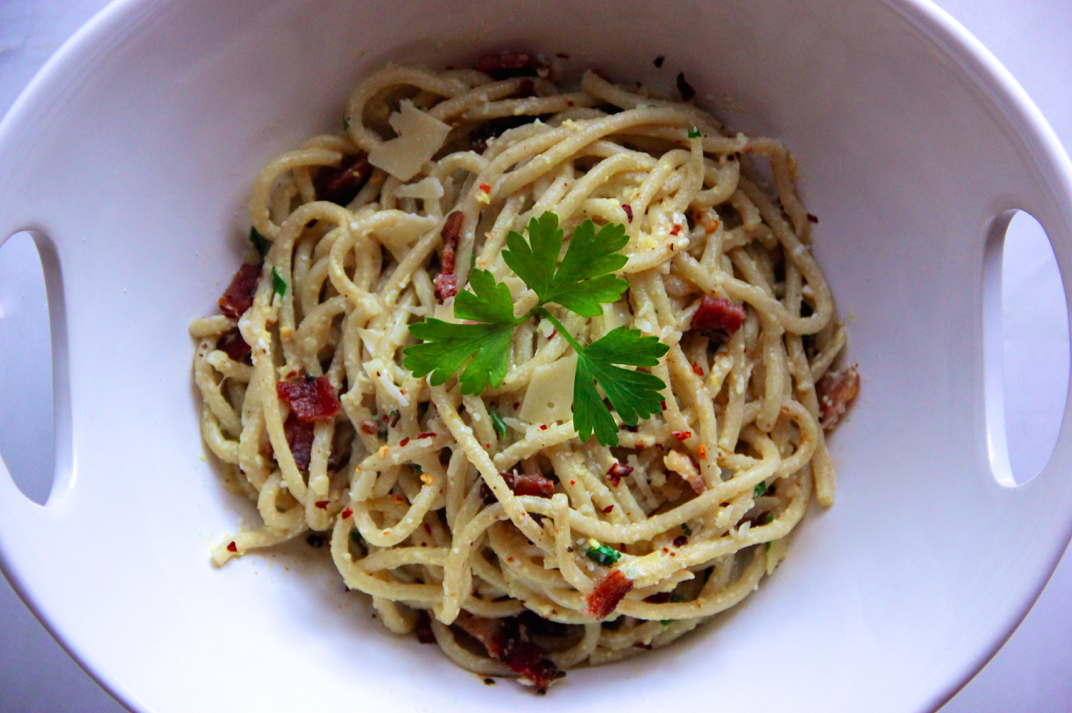
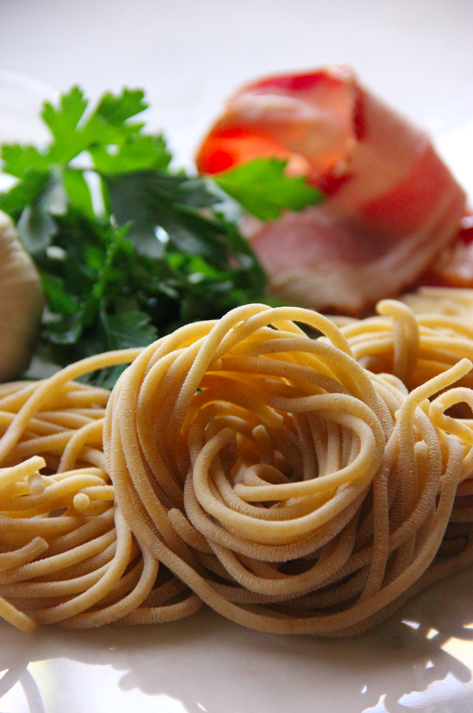
Spaghetti alla Carbonara {and thoughts on gratitude}
One of my new years resolutions for 2015 was to start each and every day off by writing down 10 things that I’m thankful for. Not only something or someone I’m thankful for, but also (and most importantly) why I’m thankful. It’s pretty easy to say “I’m thankful for my health”… but writing “I’m thankful for my mental, physical and emotional health because they collectively allow me to experience and enjoy life to the fullest” packs a much bigger punch.

Not wanting to write the same things over and over, I try to keep my lists as varied as possible. And as much as I have to be grateful for, it’s not always easy coming up with 10 new things each morning. Especially before coffee. While some mornings I have to give serious time and thought to what I eventually scribble down, this week I’ve had so much to be thankful for that it’s been more difficult narrowing the list to 10 things I’m grateful for than it has been to come up with them.
I’ve always enjoyed a naturally positive disposition, but I’ve noticed that the little things (and even some of the big things) that would normally bring me down are now things that I’m able to brush aside with [relative] ease. The gratitude notebook doesn’t magically eliminate all negative feelings, but it definitely helps in keeping them to a minimum. Life is too beautiful and full of opportunity to be tainted with chronic anger, sadness, resentment and bitterness. While these are all natural feelings that none of us are immune to, we should never allow them dominate over happiness, gratitude and love. I emphasize the word allow, because we are absolutely in control of our mindset (and subsequently our feelings).

Unfortunately, this magical control over happiness doesn’t extend past ourselves. We can (and absolutely should) do things that result in happiness of loved ones and strangers alike, but we can never actually control how they feel. And as someone whose greatest personal joy is bringing joy to others, this is a tough pill for me to swallow sometimes. It’s in those moments when leafing through my gratitude journal has the greatest impact in reminding me how fortunate and blessed that I am.
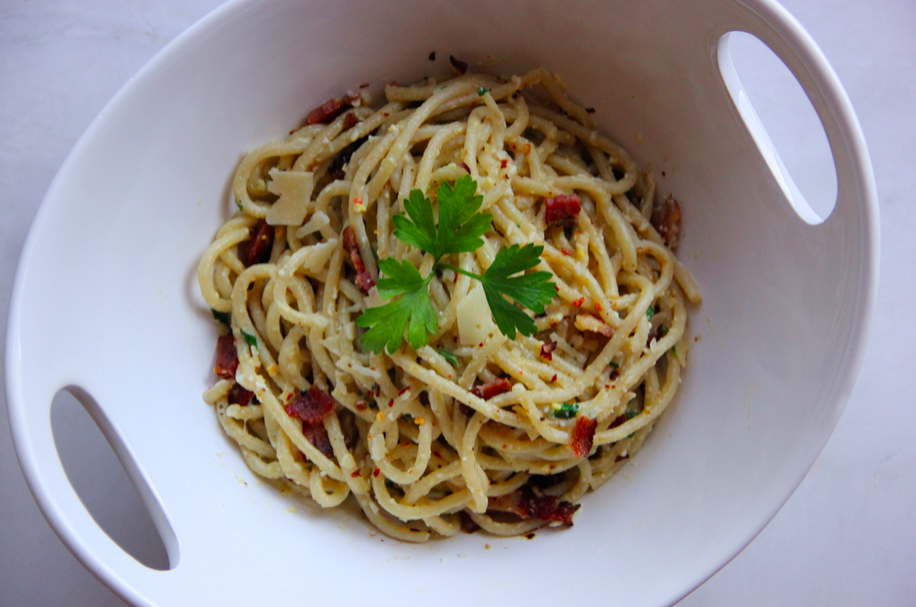
Whether by keeping a gratitude journal or finding a different way to count your blessings, regularly (and sincerely), practicing gratitude will absolutely make you happier, and will never, ever make things worse. Kind of like this heaping bowl of spaghetti carbonara….
Ingredients:
1 pound spaghetti (fresh or boxed)
4 strips bacon
3 garlic cloves, minced
2 large eggs
1 cup freshly grated parmesan
1 large handful of flat leaf parsley
1 tsp red chili flakes
Freshly ground black pepper
1 tsp fresh sea salt (preferably Maldon)
Directions:
Cook bacon as desired, reserving drippings for later use. Once cooled, chop the bacon into thin slices and set aside
Add salt to a large pot of water over medium to high heat. When water reaches a rolling boil, add pasta, cooking until “al dente” according to box instructions. For fresh pasta, it usually takes approximately 8 minutes but varies based on thickness of the noodle. Be sure to keep a close eye on it and check for consistency
Drain pasta, reserving 1/2 cup of the water to be used in the sauce if desired
Heat 2 tbsp. of bacon renderings in a large skillet over a medium flame. Add garlic and sauté for just less than a minute to soften. Quickly and carefully, add the hot, drained pasta and toss until thoroughly coated in bacon fat and garlic. Remove pan from heat and set aside.
Beat the 2 eggs then stir in the cheese, and pour mixture into the pasta, whisking quickly to thicken the eggs (eggs should not scramble).
Add reserved pasta water, 1 tablespoon at a time as desired for consistency
Mix in the bacon, red pepper flakes, ground black pepper and salt (if needed)
Garnish with chopped parsley, and serve immediately
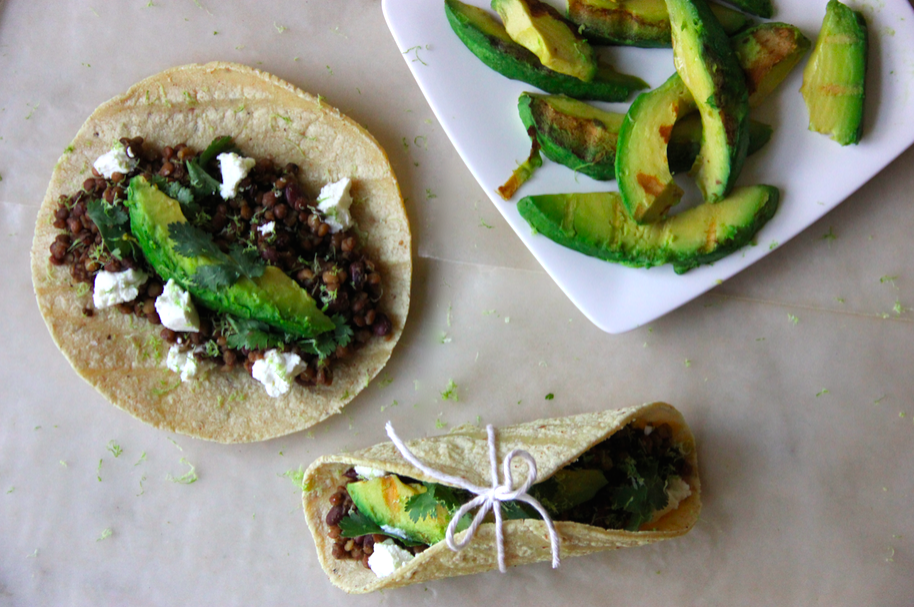
Black Bean and Lentil Tacos with Grilled Avocado

I enjoy a day of R&R as much as anyone, but generally speaking I operate best when I have a few balls up in the air. So while navigating through the process of applying to nursing school, I’ve been doing a pretty good job of keeping busy whether in the kitchen, working out, catching up with friends or immersing myself in various projects (ie: I’m on a first name basis with the entire staff of Paper Source). I’ve also been working for a finance company in the city, and am absolutely loving it. I’m so fortunate to have such a wonderful opportunity until the time comes to go back to school full time. The people are amazing, the company culture is fantastic… and the hours are early. As in, I’m walking into work as those crazy young folk are stumbling home from a night out on the town.

I definitely don’t mind the 4:00am wake up call, but my energy level at the end of the day is noticeably reduced from what I’m used to. As a result, I haven’t been experimenting quite as much in the evenings and instead find myself defaulting to some easy, fast and ridiculously yummy tried and true recipes. Like this one.

This, my friends, is the perfect lunch or dinner for those times when your taste buds crave something zesty and exciting, but your energy level is best suited for a box of Kraft macaroni and cheese. {We’ve all been there!} And, it’s pretty darn healthy! Adapted from a fantastic recipe by Naturally Ella, I’ve tweaked the ingredients a few times and settled on this version which I simply adore. I stayed true to the original recipe’s flavor profile, as the sweetness of the honey pairs beautifully with the fresh lime and spices.
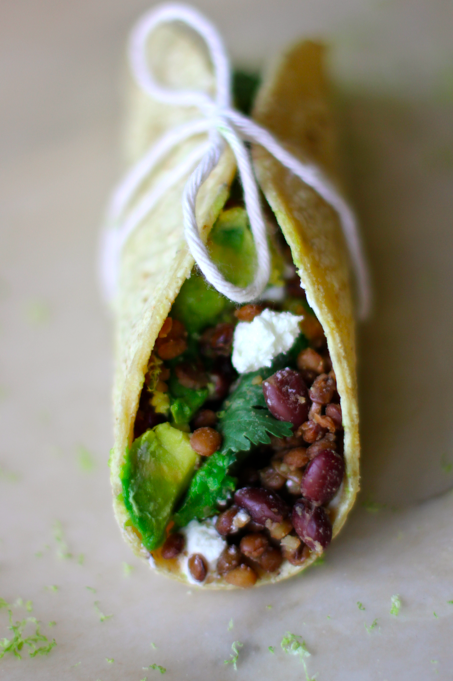
Introducing my zesty black bean and lentil tacos with grilled avocado!
Ingredients:
8 small tortillas (flour or corn)
1 can black beans
12 oz cooked lentils (I cheat and get the pre-steamed package at Trader Joe’s)
3 oz goat cheese
3-4 limes, juice and zest
6 tbsp honey
2 avocados, sliced
1 healthy bunch of cilantro
1 tbsp ground cumin
1 tbsp ground oregano
Salt to taste
Directions:
Drain and rinse the black beans, and mix with cooked lentils
In a skillet, heat up the beans and lentils with the juice of 2 limes, honey, cumin, oregano and a pinch of fresh sea salt
Stir occasionally and allow to simmer on medium heat
While the beans and lentils are heating, grill the slices of avocado using a cast iron grill, gas grill, or even a George Forman. Cook on each side for approximately 1 minute
When the liquids have soaked in and evaporated, remove the beans and lentils from heat and set aside
Prepare each tortilla with the bean and lentil mixture, adding sliced avocado, goat cheese, and cilantro leaves as desired
Take the last lime, and grate lime zest over the top of the tacos, adding a squirt of fresh lime juice if desired
Serve and enjoy!
Leg of Lamb Gyros {with lemon garlic aioli}

I have an unfortunate history of being pretty wasteful with food. The thoroughly embarrassed, defensive part of me assures you that anything not consumed is composted. The authentic part of me, however, admits that most of this waste can usually be avoided.

When I’m browsing a market, I have to bring a list. And stick to it. If I don’t have a clear outline of what I need, I come home with bags of what I want. Bags full of things I selected because they were on sale. Because they looked good. Or because I’m certain that the satisfaction I get from that pint of Ben & Jerry’s ice cream is going to be worth the caloric indulgence.

And then there’s the whole being single factor which adds an even trickier dynamic to this whole scenario. I’m sure most of you are familiar with how difficult that it can be to cook for one person, as almost all recipes yield 6-8 servings. And as good as that meatloaf is, I have no desire to eat it for 8 meals in a row.
The problem is bigger than spoiled food, though. I also end up wasting an obscene amount of money. Being smart about food shopping takes serious strategizing, so lately I’ve been making a conscious effort to focus on ingredients that I can use in a variety of dishes… before they go bad.

I recently had a great friend come to visit who loves cooking as much as I do. So naturally after setting the date of her arrival, the primary topic of discussion was what we were going to make for dinner. Kelly had a leg of lamb recipe she’d been wanting to try, which she marinated in rosemary, garlic, lemon, olive oil and pear slices (for tenderizing the roast…… who knew?). It was out of this world! Of course even though we both pride ourselves on our healthy appetites, we had our fair share of leftovers. Not willing to let something so special and delicious go to waste, we decided to make lamb gyros for lunch the next day.
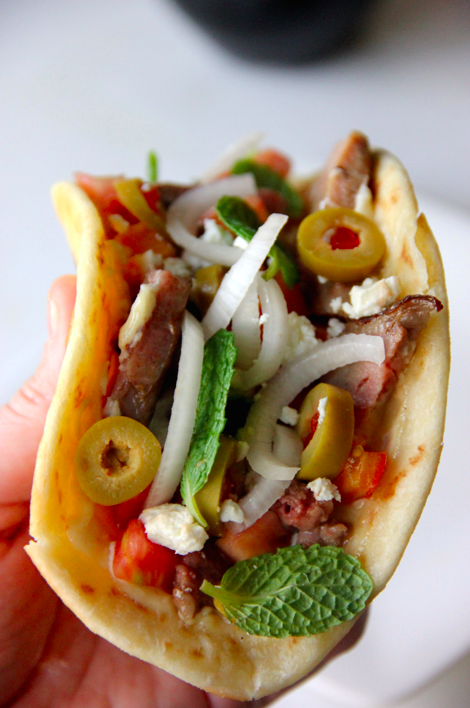
In the spirit of not being wasteful, I incorporated the leftover lemon and garlic aioli from the BLT scallop bites featured in last week’s blog post. The aioli and lamb were meant for each other, giving me a new found appreciation for this sauce which pairs just as beautifully with seafood as it does with red meat. Seriously though, I’m talking a perfect marriage of flavors…… like peanut butter and jelly, or even steak and potatoes. We spread the aioli liberally over flat bread with sliced pimiento olives, mint, white onion, tomato and feta.

The result was out of this world. But don’t take it from me… try it for yourself.
Happy Thursday, and bon appétit!
Leg of Lamb Gyros
Instructions:
Slices of cooked lamb (we used this awesome recipe)
6 flat breads (try to find ones that are soft and not too thick)
10 tbsp lemon garlic aioli (recipe found here)
1 sweet white onion, chopped
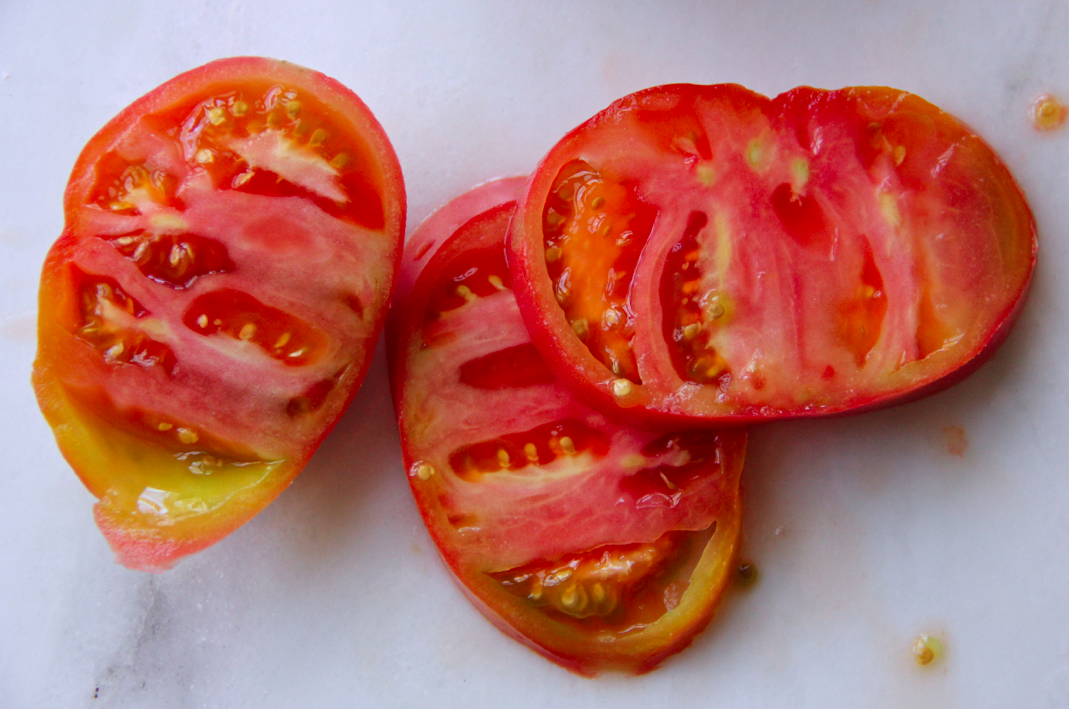
1 heirloom tomato
4 oz crumbled feta cheese
Fresh mint (enough sprigs to provide 30+ leaves)
12-15 pimiento olives, sliced
2 tbsp butter
Directions:
Heat the butter in a non-stick skillet until melted. Add the flat bread, heating in butter for about a minute on each side
Remove flat bread and spread 1-2 tablespoons of aioli over the top
Add a mixture of lamb slices, onion, tomato, feta, olives and mint over the top
**Makes 6 gyros
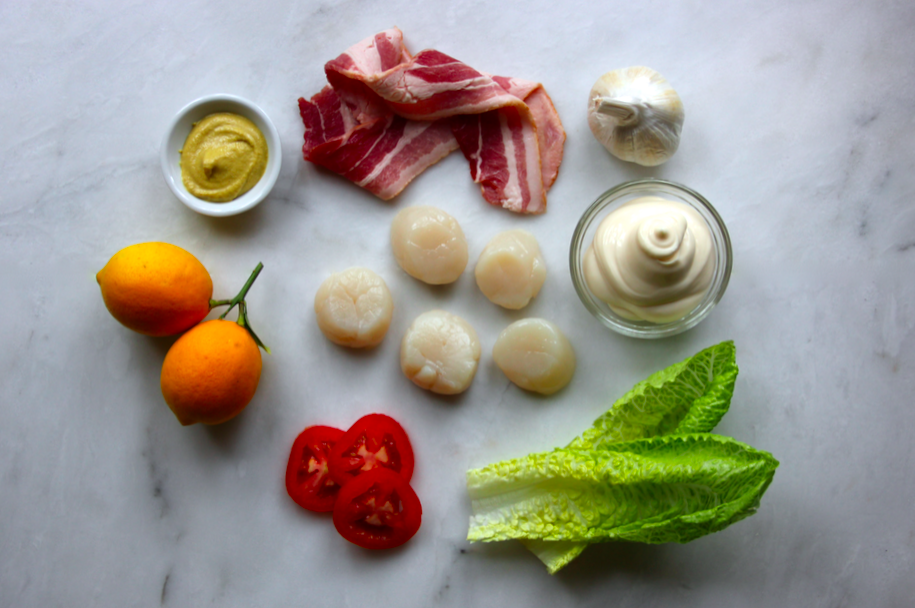
BLT Scallop Bites
I’m a sucker for bite-sized food. Not just because it’s adorable, but I swear the cuteness actually enhances the flavor and overall appeal. You also have the opportunity to taste and experience a wider variety of flavors without having to commit to one dish that may or may not turn out to be what you expected.
As much as I love throwing a formal dinner party complete with hand-printed menus, flowers and candlelight, I also love a more casual gathering with open seating and a variety of small bites to sample and enjoy. Everyone has fun sampling the various flavors, and as a bonus it’s easier to accommodate dietary restrictions and allergies.

Regardless of how casual the gathering may be, the prep never is. But that doesn’t mean I don’t love every step of the process! I’m a woman who absolutely loves to entertain. As such, I find it essential to have a handful of go-to hors d’oeuvre and ‘party bite’ recipes at the ready.

I love preparing crostini’s (with varying toppings depending on the season), and usually offer Belgian endive spears with either seafood (usually lobster or crab), or a creamy cheese and toasted nut compote. And on the subject of cheese… I always, always have a cheese plate.

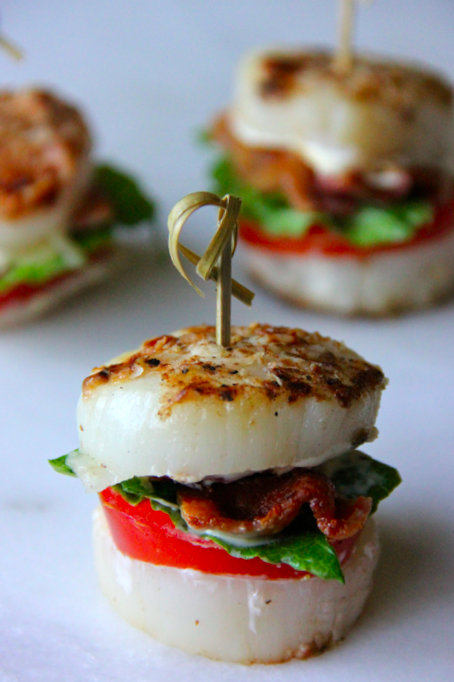
For me, half of the fun of cooking is the experimentation factor. So, in addition to my tried-and-true recipes, I love offering at least one or two new items. In searching for something new and bite sized that (at least mostly) aligned with my diet, I decided to prepare my favorite sandwich – a BLT – in bite sized servings. And as I can’t do bread and am trying to incorporate more protein, I seared and sliced scallops to use as the “bun”.
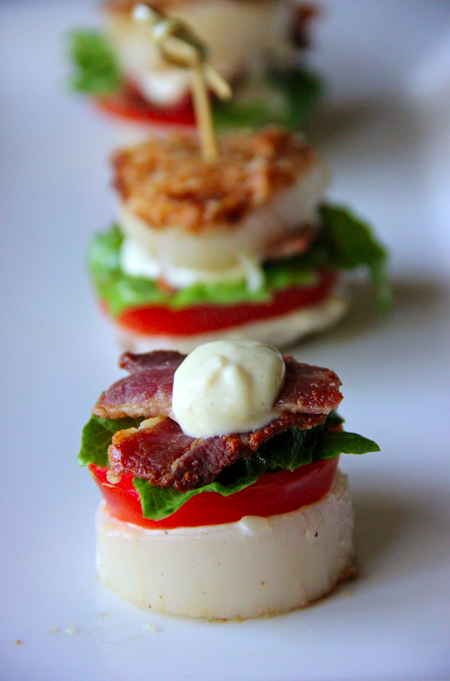
The aioli definitely isn’t diet-friendly, but it absolutely made the dish. The creamy and zesty lemon and garlic perfectly accent the other flavors, making this recipe an absolute winner.
Ingredients:
For the lemon garlic aioli:
1/2 cup mayonnaise
1 tsp finely grated lemon zest
1 to 2 tbsp fresh lemon juice (I prefer 2)
1 tsp Dijon mustard
2 cloves garlic, minced
1 pinch course sea salt
For the Scallop BLTs:
12 fresh, large scallops (preferably unfrozen, or thawed)
4 Roma tomatoes, sliced into rounds
2-3 romaine leaves, washed
4 strips bacon, cooked as desired
2 tbsp flour, mixed with a healthy pinch of coarse salt and ground pepper
2 tbsp butter or olive oil
Directions:
To prepare the lemon aioli, mix the mayonnaise, lemon zest, lemon juice, Dijon mustard, garlic and salt with an immersion blender or food processor. Set aside, adding additional lemon zest if desired for aesthetic appeal
Dust the top and bottom of the scallops in the mixture of flour, salt and pepper
Heat up a medium or large sized skillet, adding butter or olive oil. Add scallops one by one, paying attention to the order that you put them in. Cook on each side for 1-2 minutes, until the bottom is a golden brown. When ready, carefully turn the scallops over in the order that they were placed in the skillet
When both sides have reached a golden brown and the scallops are cooked through, remove from the skillet and set aside
Cut each scallop lengthwise, creating a “top” and “bottom” for the BLT bites
Prepare the “bottoms” of the scallops with one slice of tomato, bacon, lettuce, and a healthy dollop of the lemon and garlic aioli. Place other half of scallop on top, and secure with a toothpick
Enjoy!
Serves 12 Scallop BLT Bites
Fifty Shades of Red (Velvet Cake)

It’s almost here. The weekend we’ve been heavily anticipating (whether with excitement or dread). There will be formal candlelit dinners out, intimate dinners in, and grand gestures all in the name of love and romance.
No, I’m not talking about Valentines Day. I’m talking about the Fifty Shades of Grey premier. Obviously. And I’m not the least bit embarrassed to say I’ve really been looking forward to it.
Last summer, Bon Appétit published this hilarious post featuring recipes in honor of the steamy flick. You can try their crown roast of lamb (“Show that rack of lamb who’s boss; make sure it’s tied up securely”), or a cocktail called the South Side (“This cocktail requires you to slap the herbs. Please be firm, but gentle”).
Yes, sir.

Unlike Bon Appétit, my recipe this week isn’t about the movie, but about Hallmark’s ode to love (and profit). I’m honoring Valentine’s Day with a massive red velvet cake in Fifty Shades of Delicious.

I’ve played around with several variations of this recipe over the years, and the final product… well, it takes the cake (see what I did there?). But seriously… it’s moisture and perfect cake-to-frosting ratio command serious respect.

And don’t forget that tall glass of fresh milk to wash it down! I’m personally smitten with Straus Family Creamery. Based locally on the Northern California coastline, Straus was the first certified organic dairy west of the Mississippi River, and the first 100% certified organic creamery in the United States.

Their products from milk to half and half to yogurt and ice cream are each the best I’ve ever tasted in its category. Bold, and true. And, their glass bottles are reminiscent of simpler, more wholesome times. Straus is the real deal and I’m so grateful to have their products so easily accessible!

Happy Valentines Day, friends! And bon appétit!
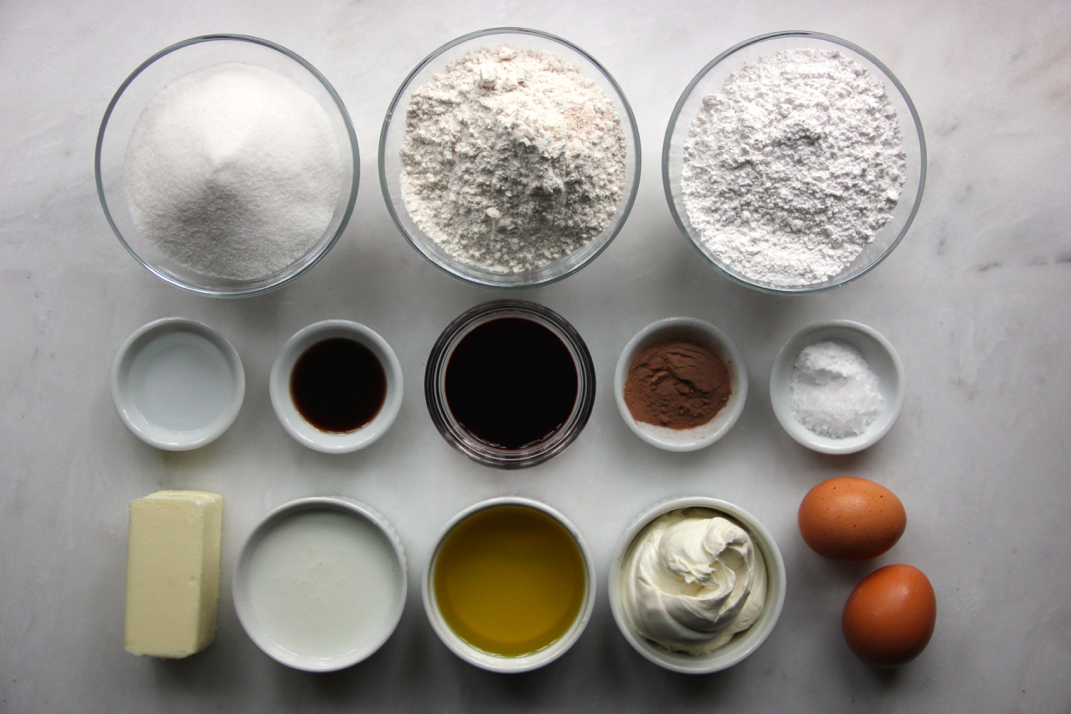
The Best-Ever Red Velvet Cake
Ingredients for the cake:
2 1/2 cups all purpose flour
2 cups white granulated sugar
1 tbsp cocoa powder
1 tsp salt (preferably Maldon)
1 tsp baking soda
2 eggs (tip: use duck eggs for extra richness)
2 cups oil (I use olive)
1 cup buttermilk
1 tbsp white vinegar
2 tbsp vanilla
8 tbsp red food coloring
Ingredients for the frosting:
16 oz cream cheese, room temperature
2 cups butter, room temperature
4 tbsp vanilla extract
12 cups confectioners’ sugar, sifted
Directions:
Preheat the oven to 350 degrees
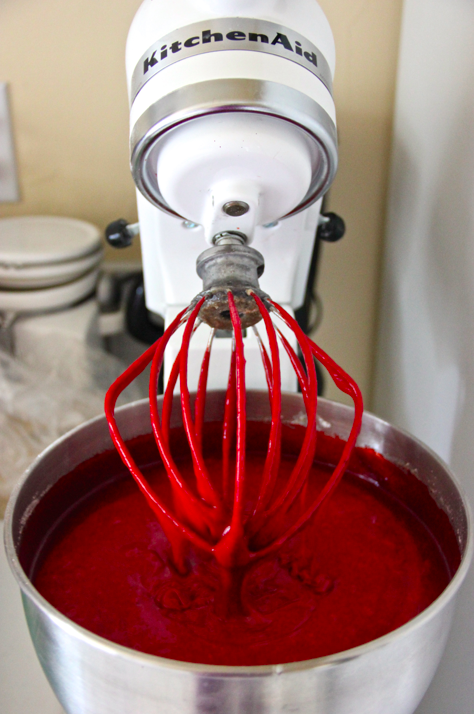
Beat eggs in a bowl or stand mixer. Slowly add the oil, buttermilk, vinegar and vanilla while mixing
Turn the speed of the hand or stand mixer down and carefully add red food coloring, being careful that it doesn’t splash when being mixed in (it stains!)
In a separate bowl, whisk together dry ingredients
With the hand or stand mixer running, add dry ingredients to wet ingredients and mix until thoroughly combined
Pour mixture evenly into two thoroughly greased 8 inch round cake pans (tip: using spring-form pans is highly recommended)
Bake for 30-35 minutes, using the toothpick test to ensure it’s done
Allow to cool before removing the cakes from the pans, then continue to cool on a wire rack (if you put the frosting on the cakes while they are still warm, the frosting will soften so that the cake does not hold its form)
While the cakes are cooling, beat the cream cheese and butter on high until whipped, then slowly add vanilla while still mixing
Slowly add sifted sugar, about a cup at a time, allowing each cup to mix in before adding the next
When cakes are cool and frosting is ready, frost away! There is a lot of frosting in this recipe (about double that of others) so you may have some left over. I personally like keeping the cake to frosting ratio as even as possible :)
For a fun and super easy decoration, you can use a cookie cutter (I used a heart) and place it on top of the cake, ensuring the edges all touch the frosting. Then, fill with sprinkles of your choice before carefully removing the cookie cutter! Easy and fun!
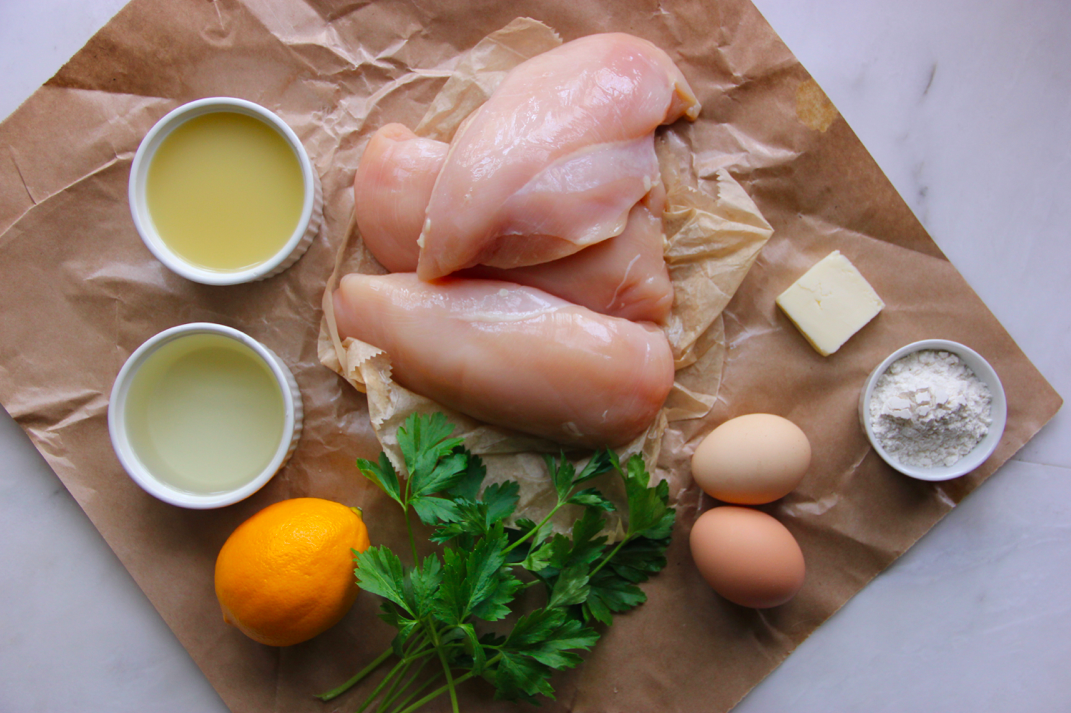
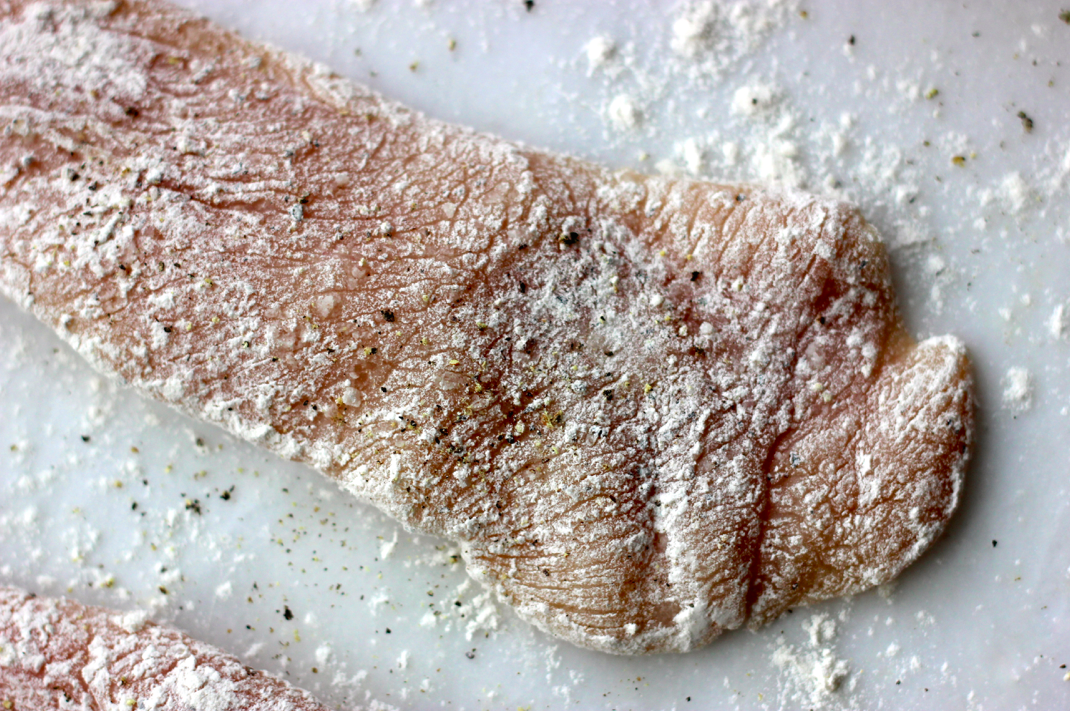
Chicken Francese

I HAVE BIG NEWS!!!
Well, big for me. In April, I’ll be indulging my wanderlust with an almost month-long trip to Palm Beach, New York, Holland, Tuscany and the Amalfi Coast.
Pinch me.
My mind is absolutely buzzing with excitement! I’m going to have the opportunity to visit friends near and far, while re-discovering favorite places and checking a few new ones off of my bucket list. And of course there’s the topic of food (you knew I’d go there). I get to rekindle my relationships with my favorite New York City haunts such as Luke’s Lobster, Mark Burger, and Eataly. In Holland (when I’m not getting lost in the rainbow of millions of flowers in the Keukenhof Gardens) I’m going to tickle my sweet tooth with traditional Dutch pannenkoeken and stroopwafel.
And then there’s Italy. The land of hand-crafted pastas and pizza, fresh cheeses, gelato and chianti. In addition to touring and tasting my way through Tuscan wineries and villages, I’m splurging on a traditional Tuscan cooking class. That’s right, I’m fulfilling the ultimate foodie dream of cooking with and learning the ways of the masters! I have a feeling that by the time I reach the Amalfi Coast, I’ll be 10 pounds happier and ready to counter-balance my carbohydrate consumption with the fresh seafood that’s native to the region.
In anticipation of shamelessly indulging my appetite throughout the entirety of the trip, I’ve decided to jump back on the Dukan Diet wagon. You probably haven’t heard of it (as it’s heavily rooted in Europe), but it’s essentially another low-carb high-protein diet. The Dukan Diet is the only program I’ve succeeded with that was actually enjoyable, in great part because it’s cheese-friendly (aka “Whitney Happy”), and requires a certain amount of oat bran consumption each day which seriously helps curb cravings for the “naughtier” carbohydrates.
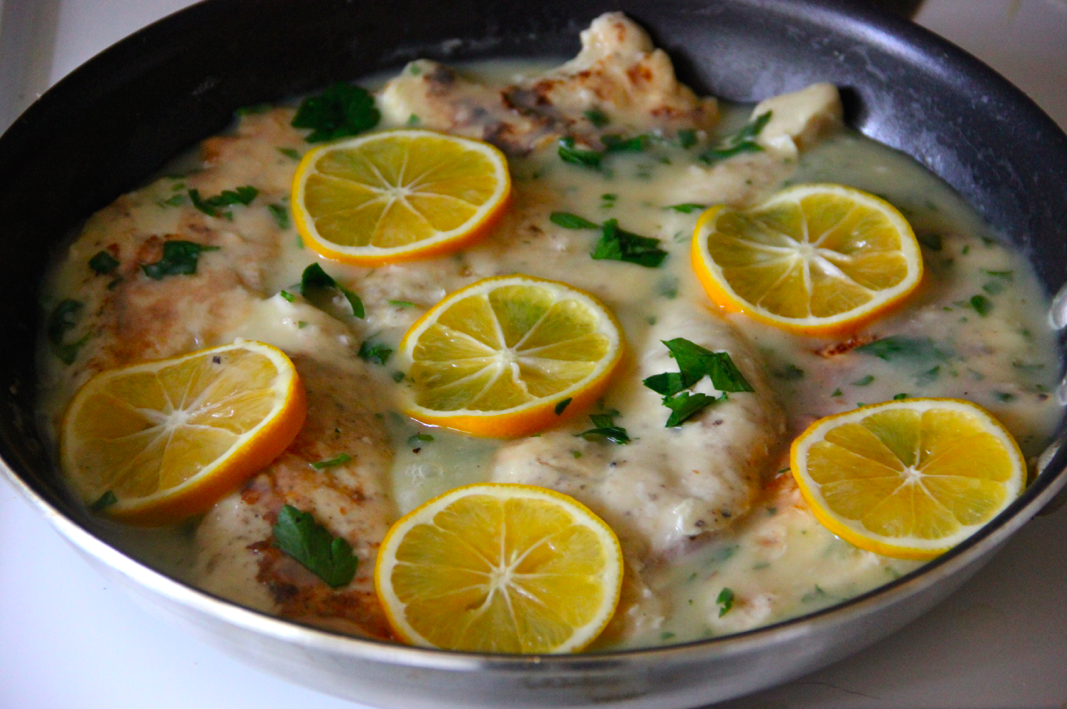
Most of the recipes that I post on Nursing My Appetite are my own, but every now and then I delight in sharing a fellow blogger or friend’s creation. Especially when they are just too darn amazing NOT to share with the world. And this, my friends, is possibly my favorite chicken dish I’ve made. Ever. I cheated a bit on Dukan with the incorporation of the wine and flour (worth it!), but it’s overall a super healthy and flavor-packed dish that will not disappoint. It is amazing on it’s own, with a side salad, or over a simple pasta (the sauce is amazing and could easily double as a lemony pasta sauce).

Introducing Chicken Francese by the ever-talented Gina of SkinnyTaste!
Buon appetito!

Strawberry Basil Tarts

Most, if not all of you will be able to relate to the mind’s seemingly endless dance between the past and the future (ie: Did I pick up the dry cleaning yesterday? Where should I take my next vacation? Did I turn off the coffee maker this morning?). I’m learning a lot about our mind’s habits and thought processes through The Power of Now by Eckhart Tolle. Although I haven’t even made it to the halfway point, I can already say with confidence that it’s the most enlightening and life-changing book I’ve read in years. As the title suggests, it’s a book about Now, the Present. What the title doesn’t reveal about the Now, and what the text explores in length, is how we are almost never actually in it. Sad, right? Though it’s important to be focused on the present, it’s natural for the mind to wander. After all, we’d never be able to remember anything or make plans if we were constantly in the Now.

Since starting the book, I’ve been paying closer attention to how often I can catch my mind wandering (and more specifically what it’s wandering to). It shouldn’t come as a shocker for me to share that it’s often about food. What do I have in my fridge? Where should Robin and I meet for lunch? I wonder if the wait at State Bird Provisions has diminished at all? You get the point. I’ll be in the middle of eating my breakfast, but my mind is preoccupied with what I’m going to do for dinner. And I’m never more distracted by all-things-edible than when I’m perusing a farmers market.

If food is my religion, then farmers markets are my place of worship (and I make for one devoted follower). In browsing the various stalls, my mind buzzes with the endless opportunities of flavor pairings and recipe inspiration. I become physically and emotionally charged by the colorful, flavor-saturated produce freshly harvested from local farms.
Winter is notoriously regarded as the least exciting of the farmers market seasons, but that never stops me from finding few seasonal treats. This past weekend’s star item were strawberries. Or more accurately the sweetest, most robust strawberries I can remember ever tasting in the history of all time.

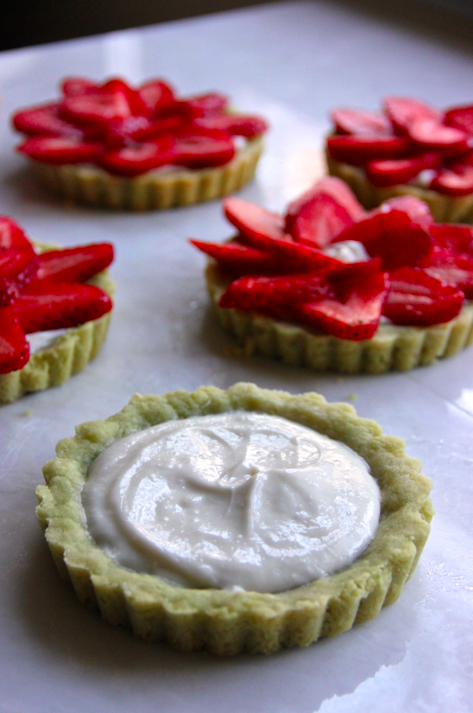
I picked up 3 baskets, and allowed my imagination to wander with possibilities. I’ve always appreciated how strawberries and basil complement each other in cocktails and salads, but the sweetness of these berries called for a dessert. Determined to incorporate basil into the creation, I decided to make strawberry basil tarts.

Wanting the basil flavor to complement but not overpower the strawberries, I blended the basil leaves into the crust with the help of my trusty Vitamix. These bad boys turned out just as aesthetically pleasing as they were delicious. And the best part was how easy they were to make! You can make little ones like I did (which are great for individual servings or to present at a tea), or go with a traditional larger size. The versatility of this dish makes it a great go-to for garden potlucks and formal dinner parties alike.

Bon appétit
Strawberry Basil Tarts
Ingredients:
1 basket of fresh strawberries, washed and sliced
6 large basil leaves
1/2 cup confectioners’ sugar
3/4 cup granulated sugar (split into 1/2 cup and 1/4 cup)
1 1/2 cup flour
1 1/2 sticks unsalted butter, softened and cubed
8 oz packaged cream cheese, softened
1 tbsp vanilla extract
1 can frozen limeade concentrate, thawed (6 oz)
1 tbsp cornstarch
1 tbsp fresh lime juice
Directions:
Preheat the oven to 350 degrees
Using a food processor or Vitamix blender, mix the confectioners’ sugar, flour, butter and basil leaves thoroughly. Basil leaves should be thoroughly blended into the mixture
Press the dough into the bottom and along the sides of a tart pan with a removable bottom (either a large 12-inch or 6 4-inch pans)
Bake for 12 minutes, or until lightly browned. Remove from oven and allow to cool
In a stand mixer, beat the cream cheese, 1/2 cup of granulated sugar and vanilla together until smooth and thoroughly whipped. Spread evenly into the cooled crust(s)
Spread the sliced strawberries evenly across the top of the tart(s), starting with the outermost layer using the larger slices, and moving inward using smaller slices as you go
Combine and stir the limeade, cornstarch, 1/4 cup granulated sugar and lime juice in a saucepan over medium heat. Continue to stir until it becomes clear and thick, which will take 2-5 minutes. Remove from heat
Using a pastry brush, paint the top of the tart with the glaze (you won’t use all of it)
Place the tart in the refrigerator until 15-20 minutes before it’s ready to be served. It will hold well for up to 5 days
Just before serving, garnish with fresh basil
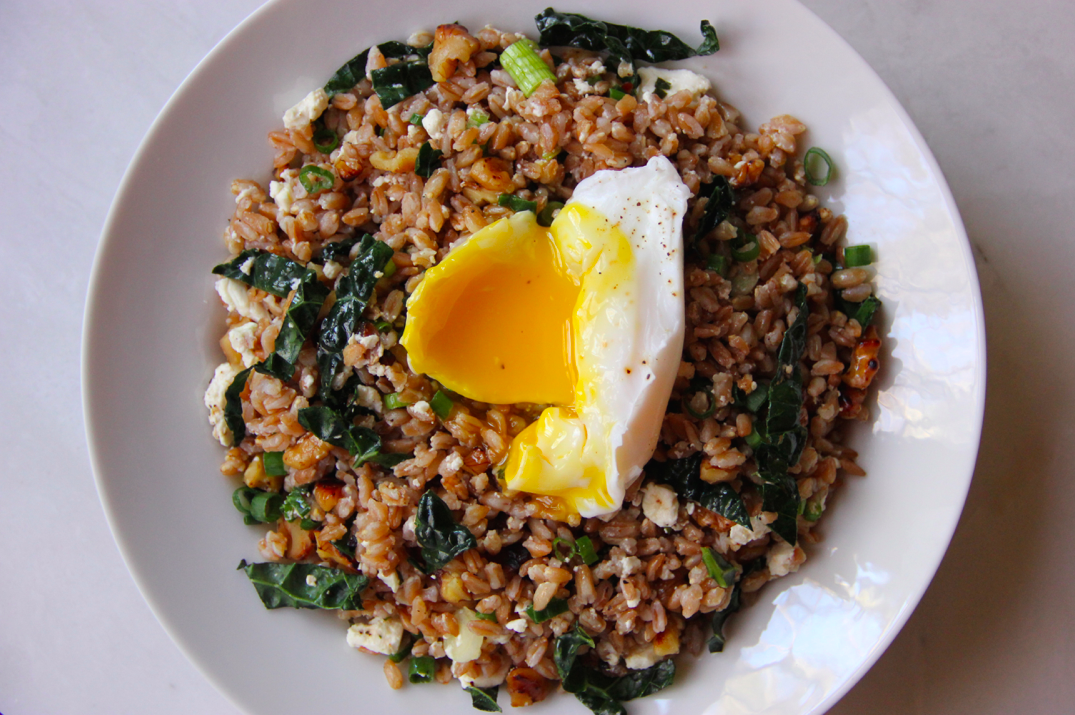
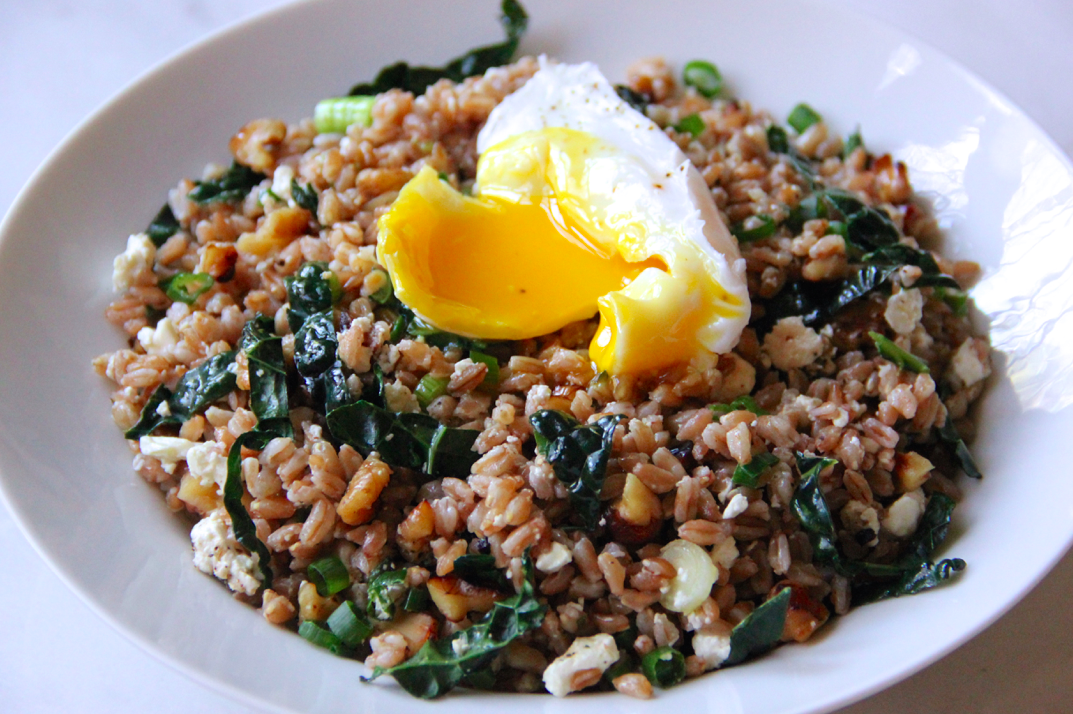
(Breakfast) Farro with a Poached Duck Egg
Having moved around a bit over the last several years, it’s not uncommon for someone to ask me if I miss living in either New York or Los Angeles. It’s also not uncommon for me to turn a relatively simple question into a conversation about food. So when you ask me if I miss New York, I’ll probably start talking about the bacon sliders at Mark Burger in the Lower East Side, or the rich, buttery lobster rolls at Luke’s Lobster. In discussing what I miss most about Los Angeles, you can bet your bottom dollar that I’ll mention Milo & Olive’s breakfast farro.
I’d heard of farro before, but don’t think I’d ever had it and certainly didn’t know anything about it until discovering it at Milo & Olive. It turns out I’m in good company, as farro is a seriously underappreciated food here in the states. In Italy on the other hand, farro is believed to be the ancestor of all wheat species and, as such, is commonly referred to as “la madre di tutte grano” or “the mother of all wheat”. In actuality, farro is the oldest cultivated grain in the world. It was both consumed as well as traded as a form of currency in ancient Rome, and 2,000 years later remains a staple in authentic Italian cooking from breakfast porridges to farroto, a twist on the ever-popular risotto.
I get a kick out of people who take flavor profiles to an extreme. Take this authentic description of a wine as offered by a professional sommelier: “its aromatics offer incredible aromas of dried flowers, beef blood, spice, figs, sweet black currants, smoked game, lavender, and sweaty but attractive saddle leather-like notes”. Yes! That’s exactly what I was looking for! The flavors of dried flowers, beef blood and sweaty but attractive saddle leather-like notes sound like they will pair perfectly with my coq au vin!
Uhm… not so much.
I admittedly don’t have the most refined of palates, so thankfully I usually don’t pick up on such distinct and eccentric flavors. I also didn’t pick up on the undertones of cinnamon and cashew that are often used to describe farro. I would however definitely describe it as hearty, and with a nutty and earthy flavor. Aside from being delicious, farro is also incredibly healthy, boasting almost twice the fiber and protein content as brown rice with about half of the calories (score!).

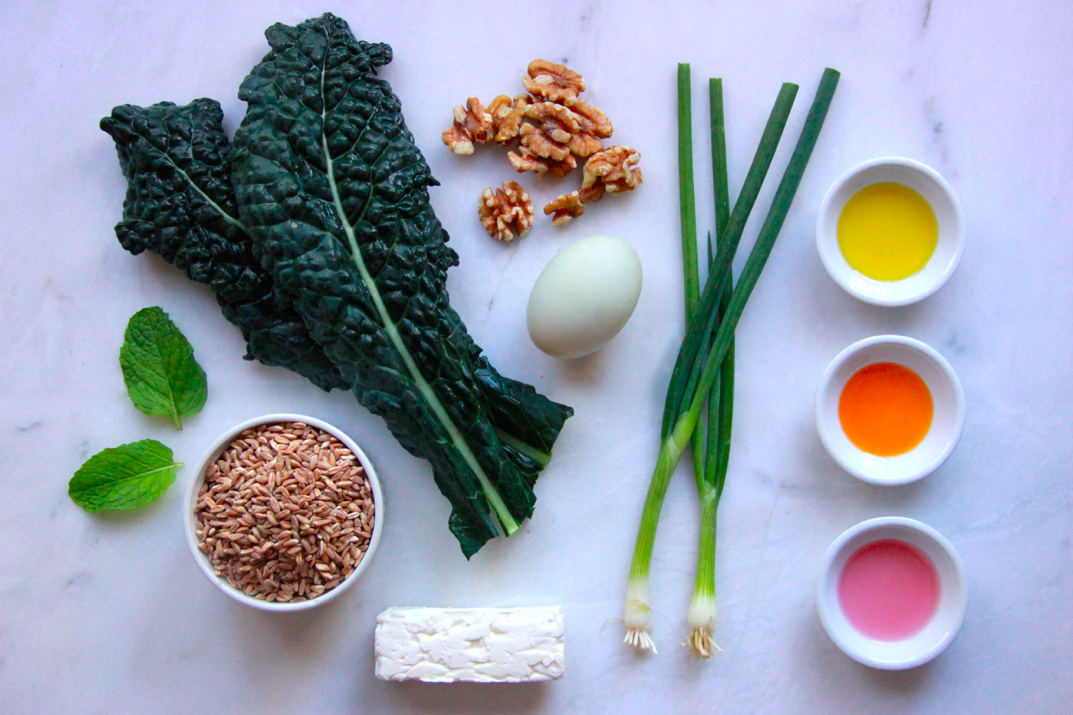
I’ve been battling cravings for Milo & Olive’s breakfast farro on and off since moving back to the Bay Area, and eventually decided to take a stab at it. I stayed true to Milo & Olive’s original recipe with ingredients such as kale, goat cheese and a poached egg, but had fun adding my own flavors such as toasted walnuts, green onion and mint. I also switched out the chicken egg with a poached duck egg, which adds an additional richness in both the flavor and consistency of the dish.

I also love duck eggs for their nutritional benefits and, quite simply, their beauty. Just look at them! And while some will be quick to (correctly) point out that they have a bit more fat than traditional chicken eggs, duck eggs yield more protein and last almost twice as long in the fridge due to the additional protection provided by their thicker shell.

I usually don’t like trying to re-create something I’ve had in a restaurant because I’m often disappointed and fall short of what I’m trying to achieve. This dish, I’m happy to say, is the exception to the norm. And don’t let the name fool you, this dish can be enjoyed at any time of the day (or night).
Enjoy, and bon appétit!
Ingredients:
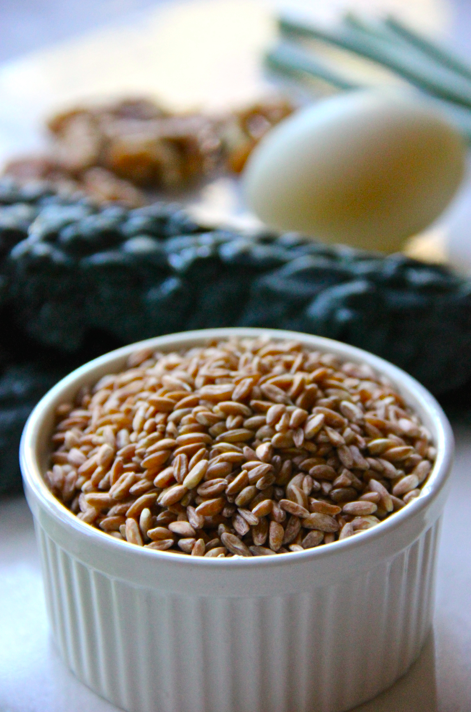
1 cup dry farro
1 duck egg
1/3 cup raw walnuts
3 tbsp chopped green onion
2 leaves of dino kale, chopped with stems removed
3-4 large mint leaves, chopped
4 tbsp crumbled feta
2 tbsp extra virgin olive oil
1 tbsp red wine vinegar
½ tsp chili oil
Water
Salt and pepper to taste
Directions:
Heat 5 cups of water in a medium sized pot. When water reaches a rolling boil, add the farro and a large pinch of salt and set a timer for 20 minutes
While farro is cooking, break the walnuts into pieces stir in small skillet over medium heat for 4-5 minutes, or until toasted. Remove from heat and set aside
Remove stems from dino kale, and roughly chop into ribbons
Chop the green onion and mint leaves, set aside with kale ribbons
In a small bowl, mix the olive oil, chili oil and red wine vinegar with a fork
Fill a smaller pot or saucepan with 2 to 3 inches of water and place over heat. Crack duck egg into a small dish being careful not to break the yolk, and set aside
When water begins to boil, stir the water until it’s spinning at a fairly rapid pace and pour the egg into the center of the circling water. Wait for exactly 3 minutes, then remove egg carefully with a slotted spoon and set aside
When farro is ready, drain and pour cooked farro back into pot. Stir in crumbled feta, toasted walnuts, oil and vinegar mixture, kale, mint and green onion
Mix in salt and pepper to taste (being mindful of the salt as the feta has a higher salt content)
Transfer mixture to serving dish, and carefully place poached egg over the top
**Makes 2 entrées or 4 side portions. Adding additional poached eggs is suggested when splitting up the dish.
Belgian Endive Spears with Uni, Burrata and Blood Orange

I’ve always had an adventurous palate. I first discovered my love for escargot at the age of six (though not sure of how to pronounce it, I simply requested the snails), and by eight, I happily made a meal out of multiple orders of carpaccio (or what I referred to as the “raw beef with capers”).

My appetite for all things unusual has made my culinary adventures that much more colorful… this week’s blog post being no exception.
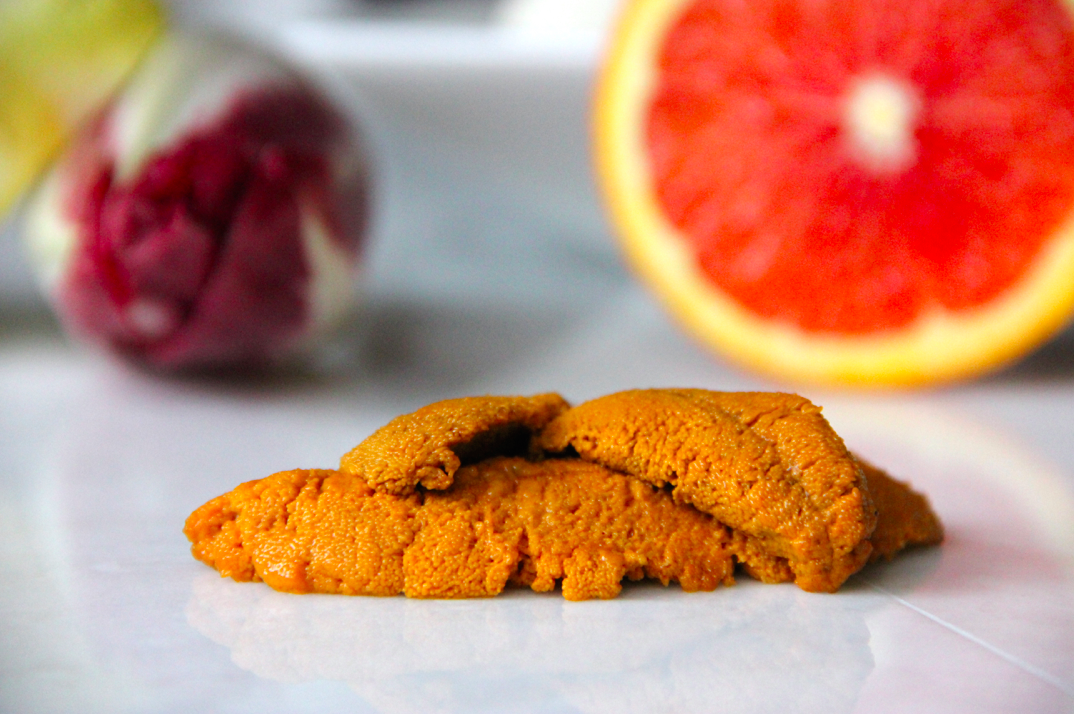
Uni, commonly known as sea urchin, is one of the few things I had to really work at learning to appreciate. The first time I tried it, I was so turned off by its almost slimy consistency that it would be nearly 15 years before I gave it another shot.

I’m so glad that I did! Not only have I come to enjoy uni, I love it so much that for my birthday a couple of years ago, my best friend Meredith arranged to have a candle presented on a plate of uni in place of a traditional cake. Weird but true.

Uni is something you don’t often find in your local grocery store, so naturally it caught my eye when I saw it in the seafood section of my local market last week. Though at the time I had no idea of how I was going to prepare it, I knew I needed to take advantage of the opportunity and bring some home.
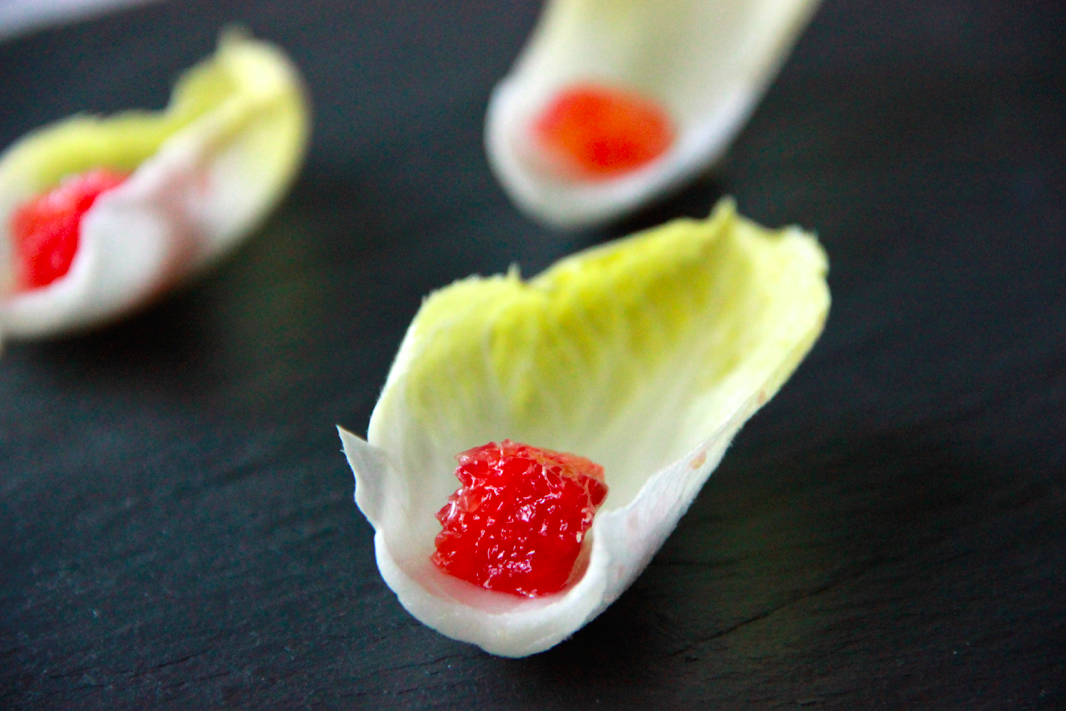
In browsing the market and considering what I knew I had in the fridge, I decided to pair the uni with burrata, blood orange and caviar on a Belgian endive spear. Unlike most of my recipes which are given great consideration and thought, I blended these flavors and textures on a whim.
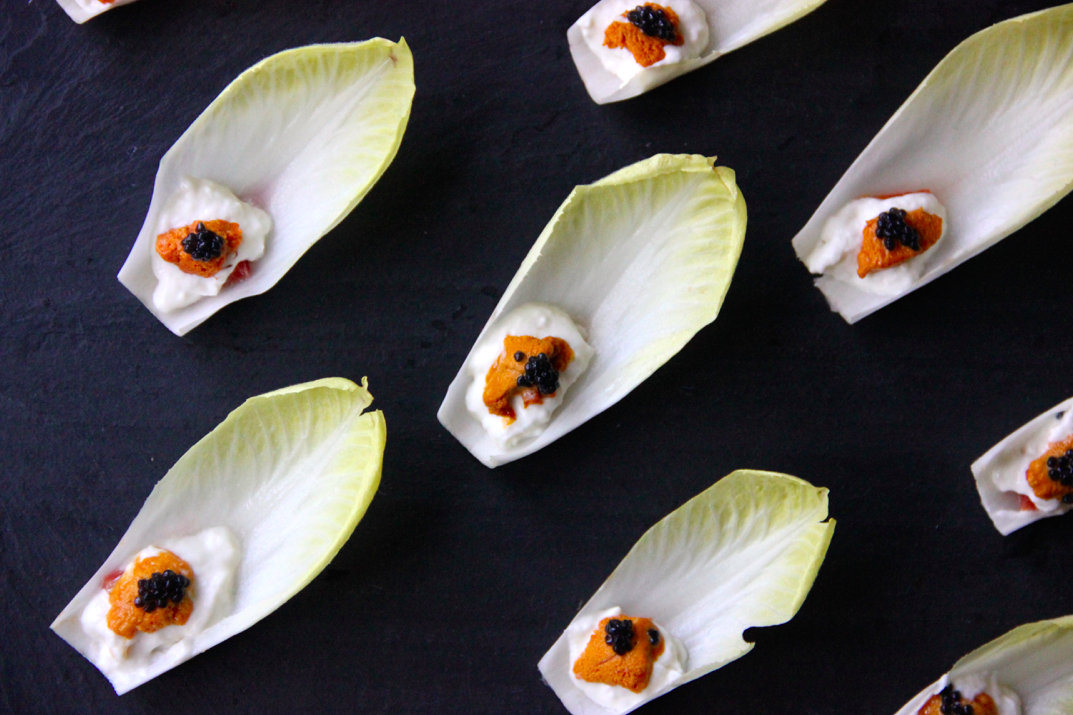
Both the uni and burrata’s creamy and slightly salty properties paired naturally with the sweet, tart flavor of the blood orange, and the endive provided a crisp, natural finish.

While uni isn’t for everyone, this is an unusual and delightful dish that is sure to spark conversation and intrigue while also pleasing the (more adventurous) palate.
Bon appétit!
Ingredients:
1 tray fresh uni (8-9 sections)
1 blood orange
4 heads of Belgian endive
1 medium to large ball of burrata
Black caviar for garnish
Directions:
Cut off the base of the endive. Separate and wash the leaves.
Cut the blood orange into sections approximately ½ inch thick. Using a paring knife, carefully cut and remove 20 sections.
Place one section of blood orange on each spear of Belgian endive.
With a spoon, take a dollop of creamy burrata from the center of the cheese, just covering the section of blood orange.
With another spoon, carefully cut a small piece of uni and place on top of the burrata.
Garnish as desired with caviar.
**Makes approximately 20 Belgian endive spears
